HTML+CSS+JS模仿win10亮度调节效果的示例代码
这篇文章主要介绍了HTML+CSS+JS模仿win10亮度调节效果的示例代码,本文通过实例代码给大家介绍的非常详细,对大家的学习或工作具有一定的参考借鉴价值,需要的朋友可以参考下
HTML+CSS+JS模仿win10亮度调节效果
代码
<!doctype html>
<html>
<head>
<meta charset="utf-8">
<title>模仿win10的亮度调节</title>
<style>
.control_bar{
height:200px;
width:500px;
border-bottom:3px solid #888888;
}
.control_bar_cursor{
height:25px;
width:8px;
background: #505151;
border-radius:5px;
margin-top:-12.5px;
position:relative;
top:0;
left:0;
}
.control_bar_cursor:hover{
background:white;
}
#control_bar_mask{
margin-top:-203px;
width:0px;
}
.mask{
position:fixed;
bottom:0;
top:0;
left:0;
right:0;
background:black;
z-index:-1;
}
</style>
</head>
<body>
<div class="mask"></div>
<div class="control_bar"></div>
<div class="control_bar" style="border-bottom:3px solid #505151;" id="control_bar_mask"></div>
<div class="control_bar_cursor"></div>
</body>
<script>
window.onload = function(){
var control_bar = document.getElementsByClassName("control_bar")[0];
var control_bar_mask = document.getElementById("control_bar_mask");
var control_bar_cursor = document.getElementsByClassName("control_bar_cursor")[0];
var def_left = control_bar_cursor.offsetLeft;
var mask = document.getElementsByClassName("mask")[0];
document.body.onmousedown = function(){
window.onmousemove = function(){
var cursor_X = event.clientX;
var cursor_Y = event.clientY;
if(cursor_X < def_left){
control_bar_cursor.style.left = 0;
}else if(cursor_X > control_bar.offsetWidth + def_left){
control_bar_cursor.style.left = control_bar.offsetWidth;
}else{
control_bar_cursor.style.left = cursor_X - def_left + "px";
}
//亮度比
var proportion = parseInt(control_bar_cursor.offsetLeft - def_left) / parseInt(control_bar.offsetWidth - 1);
control_bar_mask.style.width = proportion * control_bar.offsetWidth + "px";
mask.style.opacity = 1 - proportion;
};
window.onmouseup = function(){
window.onmousemove = null;
};
};
};
</script>
</html>
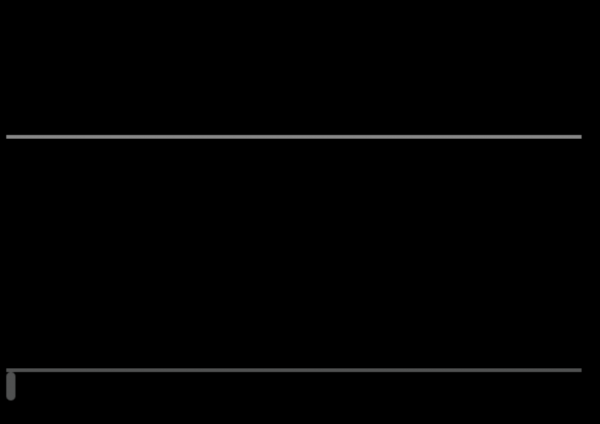
1.将各个元素的样子写出来
这里为了方便好观察给body添加了一个背景颜色
html
<div class="control_bar">
</div>
<div class="control_bar" style="border-bottom:3px solid #505151;"
id="control_bar_mask>
</div>
<div class="control_bar_cursor">
</div>
css
body{
background:back;
}
.control_bar{
height:200px;
width:500px;
border-bottom:3px solid #888888;
}
.control_bar_cursor{
height:25px;
width:8px;
background: #505151;
border-radius:5px;
}
效果图
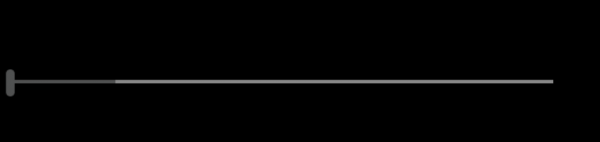
2. 将各个元素叠到一起
css
body{
background:black;
}
.control_bar{
height:200px;
width:500px;
border-bottom:3px solid #888888;
}
.control_bar_cursor{
height:25px;
width:8px;
background: #505151;
border-radius:5px;
margin-top:-12.5px;
position:relative;
top:0;
left:0;
}
.control_bar_cursor:hover{
background:white;
}
#control_bar_mask{
margin-top:-203px;
width:100px;
}
这里为了显示遮罩效果把遮罩层的div宽度设小了
3. 添加js
js
window.onload = function(){
var control_bar = document.getElementsByClassName("control_bar")[0];
var control_bar_mask = document.getElementById("control_bar_mask");
var control_bar_cursor = document.getElementsByClassName("control_bar_cursor")[0];
var def_left = control_bar_cursor.offsetLeft;
document.body.onmousedown = function(){
window.onmousemove = function(){
var cursor_X = event.clientX;
var cursor_Y = event.clientY;
if(cursor_X < def_left){
control_bar_cursor.style.left = 0;
}else if(cursor_X > control_bar.offsetWidth + def_left){
control_bar_cursor.style.left = control_bar.offsetWidth;
}else{
control_bar_cursor.style.left = cursor_X - def_left + "px";
}
var proportion = parseInt(control_bar_cursor.offsetLeft - def_left) / parseInt(control_bar.offsetWidth - 1);
control_bar_mask.style.width = proportion * control_bar.offsetWidth + "px";
};
window.onmouseup = function(){
window.onmousemove = null;
};
};
};
4. 添加一个mask用控制条来控制其透明度达到亮度调节效果
<div class="mask"></div>
.mask{
position:fixed;
bottom:0;
top:0;
left:0;
right:0;
background:black;
z-index:-1;
}
window.onload = function(){
var control_bar = document.getElementsByClassName("control_bar")[0];
var control_bar_mask = document.getElementById("control_bar_mask");
var control_bar_cursor = document.getElementsByClassName("control_bar_cursor")[0];
var def_left = control_bar_cursor.offsetLeft;
var mask = document.getElementsByClassName("mask")[0];
document.body.onmousedown = function(){
window.onmousemove = function(){
var cursor_X = event.clientX;
var cursor_Y = event.clientY;
if(cursor_X < def_left){
control_bar_cursor.style.left = 0;
}else if(cursor_X > control_bar.offsetWidth + def_left){
control_bar_cursor.style.left = control_bar.offsetWidth;
}else{
control_bar_cursor.style.left = cursor_X - def_left + "px";
}
//亮度比
var proportion = parseInt(control_bar_cursor.offsetLeft - def_left) / parseInt(control_bar.offsetWidth - 1);
control_bar_mask.style.width = proportion * control_bar.offsetWidth + "px";
mask.style.opacity = 1 - proportion;
};
window.onmouseup = function(){
window.onmousemove = null;
};
};
};
总结
到此这篇关于HTML+CSS+JS模仿win10亮度调节效果的示例代码的文章就介绍到这了,更多相关html css win10 亮度调节内容请搜索脚本之家以前的文章或继续浏览下面的相关文章,希望大家以后多多支持脚本之家!
来源:脚本之家
链接:https://www.jb51.net/web/728926.html
1. 本站所有下载资源均不包含技术支持和安装服务!需要讨论请进群!
2. 分享目的仅供大家学习和交流,请不要用于商业用途!
3. 如果你也有好源码或者教程,可以到审核区发布,分享有KR奖励和额外收入!
4. 如有链接无法下载、失效或广告,请联系管理员处理!
5. 本站无法保证资源或破解时效性,如某些授权码过期等问题,恕不在修复范围内。
6. 本站资源售价只是赞助,收取费用仅维持本站的日常运营所需!故不接受任何形式的退款,如确认资源确有问题的,会补给相应KR以供再次购买。
7. 53Kr源码暂未发现后门代码,但无法保证100%安全,推荐检测方法:上传到 https://www.virustotal.com/在线查看是否有恶意代码以及其他有后门嫌疑的代码。
8. 在本站下载的源码我还是不建议正式使用,有特别喜欢的可以去程序官方购买。
53kr资源站仅提供学习的平台,所有资料均来自于网络,版权归原创者所有!本站不提供任何保证,并不承担任何法律责任,如果对您的版权或者利益造成损害,请提供相应的资质证明,我们将于3个工作日内予以删除。
53kr资源分享 » HTML+CSS+JS模仿win10亮度调节效果的示例代码